31st March 2022 - 28th April (Week 1 - Week 5)
Emran Tarek Sayed // 0346648
Bachelor of Design (Hons) in Creative
Media
Digital Photography & Imaging // Project 1

LECTURES
Week 1 / Lecture 1
We were greeted by our lecturer, Mr. Martin, who also introduced us to
Digital Photography & Imaging afterward. Afterward, we were introduced
to Adobe Photoshop. This program will be used for the whole semester
projects given to us throughout the semester, and told to log into Google
Classroom to get more information on the projects and instructions on how
to do it.
Furthermore, Mr. Martin gave us some tips, such as watching
videos, using references, experiments, etc. Moreover, Mr. Martin showed us
some of the previous work the last students did to get an idea of what we
would do for the entire semester. Finally, we were assigned to do three
tasks for the week:
- First, get materials for the upcoming physical college task next week.
-
Play the Bezier Game.
-
Choose three favorite graphic designs from Pinterest (create an account
of it too).
Bezier Game
fig. 1.1.2 The tutorial of the Bezier Game
fig. 1.1.3 After the tutorial of the Bezier Game
The game was relatively easy as it was my second time playing it.
link: https://bezier.method.ac/ (you can try it if you would like to)
Favorite Pinterest graphic designs
1.
fig. 1.1.4 Graphic Design 1
https://www.pinterest.com/pin/550916966930310727/
I like this collage because the person uses bright yellow letters which points the attention toward it. I also like how it gives the effect of it looking like the girl's body.
2
.
fig.1.1.5 Graphic Design 2
https://www.pinterest.com/pin/1759287342860751/
I like how the skateboard person is the center of attention here with the words surrounding the person.
3.
fig.1.1.6 Graphic Design 3
https://www.pinterest.com/pin/506795764295950531/ The perspective of the legs shown gives the illusion of it looking from above; it puts a ripple effect which was lovely touch because it tells us the person is on water.
Week 2 / Lecture 2
5 Basic Compositions
Focal Point
- crucial to creating a good composition
- it helps viewers naturally focus on the essential
elements of the design
Scale and Hierarchy
- the scale (also known as size) of the element
sets the hierarchy of the design
- through the hierarchy is a method of
communicating to the viewer the order of the design pieces that
should be seen first
Balancing Elements
- the main component of good design
- the key idea is to think that each element
has some sort of weight
- For example, small shapes weigh less than
oversized shapes
- For example, flat elements weigh less
than textured elements
Rules of Third
- the process of dividing a design into
thirds - 2 horizontal and 2 vertical lines, resulting in a grid
with 4 intersection points
- a natural image is produced when the
crucial elements are placed at the intersection points
- Intersection points to demonstrate
importance - top left, bottom left, top right,
the bottom right uses negative space creatively
fig. 2.1.0 Rules of the Third
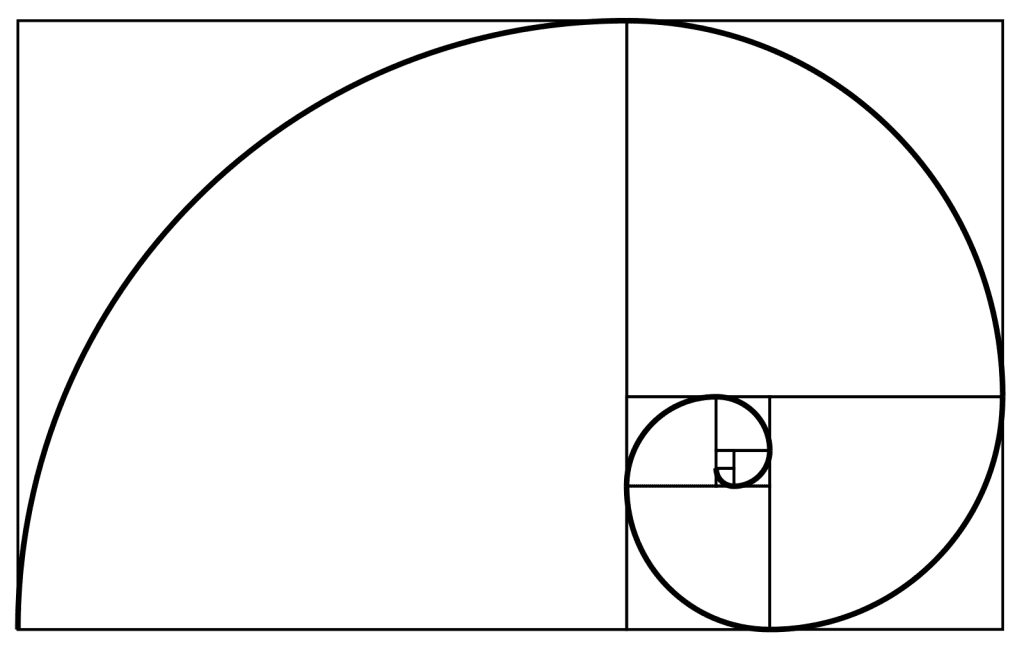
Golden Ratio
- a mathematical
ratio commonly found in nature, an organic
composition that is naturally pleasing to the eye
- following the ratio creates harmony
and proportion
- a guideline to determine photo
dimensions
fig. 2.1.1 Golden Ratio
Physical Collage pre-compositions
fig. 2.1.2 Pre-Composition 1
fig. 2.1.3 Pre-Composition 2
fig. 2.1.4 Pre-Composition 3
Week 3 / Lecture 3
As for week 3, we started using Photoshop and learned
how to use the pen, lasso tool, and layering. The
devices are materials we use to cut an object from
different background to another background. As we had no
idea how to use them, we were shown by Mr. Martin how to
use them step by step. Then he proceeds to tell us to do
the same. So here is what we did:
Pen, Lasso Tool, and Layering exercise
fig. 3.1.0 The exercise we did in our class
After we learned how to use the
tools, we were given another task: to create another three
pre-composition digital collage pictures shown by Mr.
Martin. Unfortunately, I was not there due to some
circumstances when we were given this task, but I did the
work but only did two pre-composition instead of
three.
Digital Collage pre-compositions
fig. 3.1.1 Pre-Composition 1
fig. 3.1.2 Pre-Composition 2
Week 4 / Lecture 4
<iframe
src="https://drive.google.com/file/d/1GuJPeIvL_SJ3s0-vT-m0EEx1nC5humqT/preview"
width="640" height="480"
allow="autoplay"></iframe>
TASKS
Project 1
Week 1
-
Week 2 / Physical Collage
In project 1,
we, the students, need to do two types of collage: a physical collage and
a digital collage.
Physical Collage
A few things need to be
considered before starting doing physical college. First, collecting the
materials, I would need to find a few pictures from magazines, novels, and
newspapers, or it could be on the internet. Secondly, I would then cut
them out into pieces I find suitable. Thirdly, make pre-composition before
deciding on the final product. And finally, glue them together into one
least significant bit.
As I had done collage previously, I already had an
image ready for the collage, so I immediately proceeded to create the
pre-compositions of the physical collage.
fig. 2.1.5 Pre-Composition 1
A man is sitting on the moon, drinking his coffee, and minding his
business with an aesthetically pleasing background to match the man's
vibe. So I didn't think much and tried to keep it simple for the first
composition, not overdosing on the collage with many details.
fig. 2.1.6 Pre-Composition 2
How do I make the collage even better? While creating the second
composition, I thought I put what I put above. I tried putting similar
elements not to break the vibe the first composition gave out. It would
be weird to put bright green color in the collage suddenly. Instead, I put a
cloud on the head, indicating the cloud growing on his head while the
tea feeds the cloud to increase even more significantly. The items found
floating beside the man show the gravity of the moon.
fig. 2.1.7 Pre-Composition 3
As for the third composition, I tried
repositioning all the materials to give it more depth. I even add the
other half of the head floating around to provide the composition with
more details to look at. Also, as you can see, I love keeping my
details small and neat, so this won't be confusing for the reader's
view, and I can pretty much get what the composition is showing right
off the bet.
Week 3 / Digital Collage
Similar to the previous week, I have to make
another set of collages, but this time would be a digital collage
instead.
Digital Collage
This time, I would have to use the knowledge I
learned from Mr. Martin's class; the pen, lasso tools, and layering are
what I am referring to create this digital collage. However, there is a
twist this time, we are restricted in using any pictures now, but we
have to use the images Mr. Martin gave to create the collage.
fig. 3.1.3 Pre-Composition 1
I feel the first composition isn't so
great as it feels bland. I wanted to show the fight between a shark
and a human in this collage, but I feel like I did not execute it
enough as I did not use many details in this composition. Maybe, I
should put more information to give more depth.
fig. 3.1.4 Pre-Composition 2
I did much better in this second composition
than in the first one, as the fish blends well with the background.
Additionally, the building has shown us the illusion of looking from
below. And as you can see, from that perspective, the fishes are
just swimming/roaming around in the air with the glittery
background, which makes us believe the fishes are swimming in
glittery water.
Week 4 / Final Collage Product
With all the feedback given to us by
Mr. Martin this week,
I have to choose one collage out of the three compositions for both
physical and digital collages I created in the previous weeks to be
our final collage for our project 1 task.
Physical Collage
It was easy to pick which collage to choose as
the final ones with all the feedback I have been getting from Mr.
Martin.
fig. 4.1.0 Final Physical Collage Composition
Digital Collage
Comparing the two compositions I made for
digital collage. It was easy to pick which one to be its final
product.
fig. 4.1.1 Final Digital Collage Composition
Final Collages
<iframe
src="https://drive.google.com/file/d/1kSnFhIKAABkQ5RULzZ6Uqmg1q6nnHt5d/preview"
width="640" height="480"
allow="autoplay"></iframe>
FEEDBACKS
Physical Collage
General Feedback: No general feedback.
Specific Feedback: Overall, he liked all of my compositions, but two of
them were simplistic and centered, so he decided to call my third
composition the best out of all.
Digital Collage
General Feedback: No general feedback.
Specific Feedback: My first composition was dull; there was no impact in
any way or form. In other words, it was just way too basic. On the other
hand, the second composition was well done; the background was just
lovely. Other images really blend significantly with the background. It
was recommended to pick the second option.
REFLECTION
Experience: I had no experience using photoshop, so I thought I would do
poorly in this module, but it was not as bad. I learned how to photoshop
step by step, and I got there. It was not that hard for the digital part, but it was definitely a challenge for the physical aspect. Mainly
because, for the digital, we did not need to find the materials as all of
it was given by Mr. Martin, but for the physical part, we had to find our
own materials and compose them using scissors, glue, etc.
Observations: At first, I had no creativity in making an excellent
collage for both digital and physical. But as time progressed, I developed
some creativity in it and did pretty good in composing both physical and
digital collages.
Findings of the task: I find both tasks exciting and fun. I never really
found it that fun previously, as this is not my first time composing a
collage. However, Mr. Martin did outstanding interacting with us students and
making it fun to do these collages. One example was letting everyone
review our collages, which was a great idea. It was tough initially, but
with Mr. Martin's guidance, I managed to get through it.


Comments
Post a Comment